1、 Current situation of the computer room
This project aims to rectify the disorderly wiring and temporary stacking of equipment in the data center of a certain tumor hospital, which seriously affects the normal use of business and makes daily maintenance difficult, in order to achieve a clean and beautiful data center that is easy to maintain.
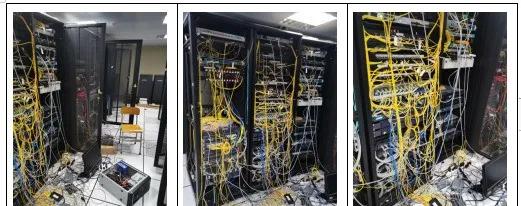
2、 Several principles for organizing cabinets
To organize network cables based on the topology of the network and the existing equipment situation:
1. The power cables and network cables of the cabinet should be separated and organized in principle;
2. The placement of equipment should be appropriate, avoiding mutual squeezing, avoiding being too high or too low, and avoiding being too close to each other;
3. If there are too many devices in the cabinet, they should be numbered;
4. Each line should be labeled with its source at an appropriate location;
5. There should be different identification methods for different connections (such as general network connection lines, crossover lines, dedicated lines, etc.);
6. The arrangement of network cables is based on room numbers rather than people.
In summary, the layout is clear, the line sequence is orderly, the labels are clear, easy to maintain, and the reasonable use of labels is particularly important.
3、 Cabinet organization steps
1、 Preliminary preparation
Firstly, users should be notified to label cables and organize cabinets without affecting their normal work.
Then, based on various factors such as the topology of the network, the existing equipment situation, the number of users, and user grouping, draw the wiring diagram and equipment location diagram inside the cabinet.
Next, prepare the necessary materials:
Network jumper, fiber optic jumper, power cord, label paper, marker pen, plastic cable tie.
2、 Organize the cabinet
1. Install cabinet:
We need to do the following three things ourselves:
Firstly, use the screws and nuts of the random frame to tighten the fixed bracket;
Secondly, flip down the cabinet and install the movable wheels;
Thirdly, adjust and add baffles on the fixed frame according to the position of the equipment.
2. Organize the route:
Group the network cables, usually less than or equal to the number of cable racks behind the cabinet. Tie the power cords of all devices together, insert the plug into the through hole at the back, and search for each device through a separate cable rack.
3. Fixed equipment:
Adjust the baffle in the cabinet to the appropriate position, so that the administrator can see the operation of all devices without opening the cabinet door, and add baffles appropriately according to the number and size of devices. Be sure to leave a certain gap between the baffles. Place all the switching and routing devices used in the cabinet according to the pre drawn diagram.
4. Network cable labeling:
After all the network cables are connected, they need to be labeled. The prepared labels should be immediately wrapped around the cables and marked with a pen (usually indicating the room number or purpose). The labeling should be simple and easy to understand. Cross network cables can be distinguished from regular cables by using instant stickers of different colors. If there are too many devices, they need to be classified and numbered, and labeled.
3、 Post production work
1. Power on test:
After confirming the correctness, turn on the power and conduct network connectivity testing to ensure the normal operation of the user – this is the most important.
2. Document update:
Update the document on the content of the cabinet organization this time. Redraw the equipment layout diagram and network cable connection diagram. The equipment number and network cable identification should be indicated on the diagram for maintenance reference. It is best to include the username as an item in the diagram, and finally indicate the date and contact information.
4、 Cabinet wiring process
An important part of cabinet organization is cabinet wiring, and there are three common wiring processes:
1、 Waterfall design
This is a relatively ancient wiring design, and sometimes its traces can still be seen. It adopts the artistic image of “Huaguo Mountain Water Curtain Cave”, where twisted pair cables are hung directly from the modules of the distribution frame, creating a beautiful sense of hierarchy when distributed neatly (24-48 twisted pair cables per layer).
The advantage of this design is that it saves on manual line management, but it has many disadvantages.
For example:
(1) When installing network equipment, it is easy to damage the appearance, and even difficult to install the network equipment in place;
(2) The weight of each twisted pair cable is converted into tension, which acts on the rear side of the module. If the twisted pair cable is not tied before the termination point (3), this tension may separate the module from the twisted pair cable months or years later, causing a wire breakage fault;
(4) If a module in the distribution frame needs to be re terminated, maintenance personnel can only enter the “water curtain” for construction, sometimes wearing dozens of twisted pair wires, and due to the lack of light sources in both directions, it is difficult to see the termination clearly.
2、 Reverse reasoning line
Reverse wiring is performed after the module termination of the distribution frame is completed and tested, followed by cabinet wiring. The method is to start wiring from the module to the outside of the cabinet, while also wiring inside the cable tray.
The advantage of doing this is that after testing, the wiring will not be re routed due to a twisted pair cable failing the test. However, the disadvantage is that since both ends (inlet and distribution frame) are already fixed, there will inevitably be a large number of tangled wires in a certain part of the computer room (usually at the bottom of the cabinet).
Reverse alignment is generally done manually, relying on the naked eye and hands to complete the alignment.
The advantage of reverse wiring is that the testing has already been completed, so there is no need to worry about the cable length behind the cabinet. The disadvantage is that because the two ends of the cable are already fixed, there will be a large number of crossings between the cables, which is very difficult to tidy up. Moreover, there must be a scattered twisted pair between the two fixed ends, which is often located under the floor (when the cable enters below) or on the ceiling (when the cable enters above).
3、 Positive Line
Forward wiring is done before terminating the distribution frame. It starts from the inlet of the computer room and organizes the cables section by section until they reach the module of the distribution frame. Perform termination and testing after wiring.
The goal that the positive line aims to achieve is:
The horizontal twisted pair cables from the inlet of the computer room (or network area of the computer room) to the distribution cabinet form a bundle of horizontal twisted pair cables in units of 16/24/32/48 port distribution frames. All twisted pair cables in each bundle are parallel (the crosstalk between short distance twisted pair cables will not affect the overall performance, because most of each twisted pair cable is laid in the cable tray and conduit, which is scattered and non parallel), and all twisted pair cables are parallel to each other; After verification, fix it on the cable tray behind the module or insert it into the module hole of the distribution frame.
The advantage of forward routing is that it can ensure that the cables in the computer room are neat at every point and there will be no cable crossings. The disadvantage is that if the cable itself is damaged during threading, failing the test will result in rewiring. Therefore, the premise of positive wiring is to have sufficient confidence in the quality of cables and threading.
5、 Cabinet wiring steps
1. Firstly, measure how many lines are needed.
The basis is to determine the location for placing the distribution frame, and then calculate how many network cables are needed to connect the distribution frame and install the cabinet, taking into account the distance of the cables entering the cabinet from the outside. This is to facilitate the overall wiring arrangement later on. If the cables are placed too long in the cabinet, it can easily cause unsightly situations, and later wiring arrangement is more complicated. It is necessary to keep pulling them back in order to tidy up the cables neatly and beautifully.
Secondly, it is necessary to comprehensively consider how the cables should be routed after entering the cabinet from the top or bottom, and try not to bend or bypass some things. They should be routed from the top to the bottom of the cabinet, and the direction of the wiring should not affect the subsequent entry of network equipment. This requires the staff to have a certain degree of foresight.
2. Cut off excess
Cut according to the length calculated in the first step. Cut off the excess, be sure to be consistent as much as possible to avoid affecting the appearance, and leave some redundancy beyond the calculated amount. It is best to leave ten to fifteen centimeters, including cutting off the foreskin and adding the length of the distribution frame. At this point, there is no need to insert the cables into the cabinet from the outside, as it may be difficult to manage the wiring.
3. Next, let’s start organizing the lines
At the point where the cable root begins to expose, tie it up with zip ties.
As needed, tie most of the network cables and start using the distribution board to organize them. The method of using the distribution board is to thread the cables one by one from the back of the distribution board according to a convention, and tie them together with two consecutive network cables with zip ties on the back of the distribution board. Every two ties should have a misalignment, that is, do not tie them too much side by side. It is best to have a distance between the top and bottom of every two ties. After two consecutive ties are tied together, six network cables should be tied together, and it is necessary to re tie them every half a meter on average. When tying them together, pay attention to neatness and do not tie them together randomly, which will give people a sense of disharmony.
4. Tie the wire
Use the wiring board to move downwards continuously, and wrap the back of the board with zip ties (half a meter per tie). The last time the six strands were tied together was about one meter from the end of the offline cable. After tying, they were tied together in pairs at a nearby distance, but of course, they were tied in order. After tying every two wires, use the same method to tie them again about half a meter downwards, which is beneficial for the next step of installing the distribution frame.
5. Wiring frame
The next step is to start laying the distribution frame. After the above work is completed, the cables are already very clear. Throw the cables outside the cabinet and place them on a workbench in groups of three to start the wire pressing work. Pressing the line according to the pre arranged position is less likely to make mistakes. The specific process steps of wire pressing will not be repeated here.
6. Test the tested patch panels,
After passing the test, install the cabinet and carefully check the contact and sequence of the network cables and modules if any issues are found. Strive to pass them all at once. After all the test modules are pressed, start installing the cabinet. After installation, tie the network cables according to the original plan to achieve neat, beautiful, horizontal, and vertical alignment. Record the connectivity of each point, and if it still cannot pass, record it in the remarks


